Friday, December 26, 2014

TM Extravaganza - Sunday 28th December!

We hope you have all had an amazing Christmas and have enjoyed eating, drinking and being merry!

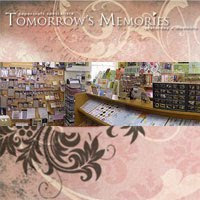
We wanted to remind you all that we are open on Sunday for our special day, celebrating our Design Team with our 'TM Extravaganza' and shop sale from 10am - 4pm! 


We hope to see you all during the day.... If you come in for 11am you can enjoy morning tea with the Design Team girls, they would love to see you!


New 'Design Team' Project Kits will be released...
...There will also be selected Project Kits at 30% OFF and 50%


Great products on sale including latest release Couture Creations dies and Couture Creations decorative frames. 


Some stunning new stock has arrived too.
Hope you can pop down to say hi

Tuesday, December 23, 2014

Kaisercraft "Off the Wall" Layout Video | Louise Beerens

Hi everyone, it's Louise here with a process video.  I had some leftovers from my shop samples for Kaisercraft's "Off the Wall" Collection and thought I'd put together a quick page and record the process.


Here is my final layout.....


Here is a video showing how quick and easy this was to put together.....


You can watch it here, or over at YouTube. I hope you enjoy it!

Monday, December 22, 2014

Let it go?

Hi, Rikki here today with a little share show casing the lovely Your Creative Wings Chipboard. 
Who can go past NEW Chipboard and especially ones inspired for this festive season..... 

Or in this case for the Frozen OBSESSED, Elsa /Anna loving, all singing, all dancing, theater actor 4 year old's in your life!!!!! 

Maybe I should LET IT GO!!!! 


 To start something like this use your Prima Art Basic Texture Paste though any stencil and allow it to dry naturally dont rush the process with a heat gun......


Now dont be scared spray your cardstock with water and I mean a lot of water!!!!!! Till the page is super soggy and even spray the back of it as well.... this will stop some of the paper warping when your trying to blend the colours together.


 Now mist away or even use  paint brush and go nuts with colour...... move the page around to bleed colours together...... when your happy leave it to dry over night. This will allow the paper fibers to shrink back at the same rate and will keep your warping to a minimum.


Now your proberly wondering why I said leave the texture paste to dry naturally..... I have found when doing this heavy water technique it will lift the texture paste away from the cardstock.


Now you just have to pick the perfect photo, and colour the Your Creative Chipboard and your done. If your feeling brave why not try this with the kids just make sure you have paper towels handy.

If your looking for supplies head into the shop and grab some today.

Till next time, have a creative day
Rikki 
xxxxxxx

Saturday, December 20, 2014

Cherry Blossom Fussy Fun

Good Morning, Rikki here today with another share and its with the beautiful Kasiercraft Cherry Blossoms range and it would be me unless I did some fussy cutting right?

This range has a couple of stunning pieces that are perfect for this and they just fit so right together......


Dont forget to use your foam mount to add instant height it also allows you to tuck in other elements to add depth, like the Kasiercraft Rhinestones.


 Dont throw away the bar code strips, they give you an instant title for your page.


12x12 Scrapbook Paper Fragrance

12x12 Scrapbook Paper Garden

12x12 Scrapbook Paper Petal
So why dont you pop into the store and grab some of these stunning papers.....
So till next time, have a creative day

Rikki 
xxxxxx

Wednesday, December 17, 2014

Kasiercraft Sandy Toes

Good Morning, Rikki here today with another Kaisercraft Sandy Toes share, and the timing couldnt be better with the weather slightly warm up over the next couple of days here in the West. And if your feeling inspired why dont you pop into the store to grab some of this paper.


When doing layers I love textures like the Kaisercraft Corrugated card, its is so versatile and helps support all your other layers on the page.


The boarders and diecuts in the Kaisercraft Sandy Toes 6x6 Paper pad give you loads of instant layers to add to your layout.


 I love the Kaisercraft Distressed overlays over your photos either staple them on or in a little corner use some glossy accents to help adhere it to your photo. Also they Kaisercraft Distressed Overlays have a protective cover on so dont forget to peel that off, this means that you can guarantee that they overlays have no scratches on them.


Another thing that is a must on a beach layout is a raw chipboard, this Your Creative Wings piece is the perfect finishing touch and it helps tie in the twine. 


12x12 Scrapbook Paper Ocean

Sandy Toes Paper Pad

Distressed Photo Overlays

Prima Art Basics Heavy Gesso - White

Till next time have a creative day 
Rikki 
xxxxxx

Sunday, December 14, 2014

Kaisercraft Cherry Blossom Cards

Good Morning, Rikki here today with something that I dont normally do....... CARDS!!!!!!!! Yes people that know me can say that I do not do cards, especially scrapped cards. So to say I was out of my comfort zone was an understatement. 

But I am very happy with the results plus it used all my leftover bits, which eliminated hoarding small bits of paper. 


12x12 Scrapbook Paper Fragrance


12x12 Scrapbook Paper Petal


12x12 Scrapbook Paper Garden


So dont forget to use your leftovers and at this time of year a card or two doesn't go astray for sure.

Till next time, have a creative day.

Rikki 
xxxxxx


Friday, December 12, 2014

Kaisercraft Cherry Blossom fusion

Good Morning, Rikki here today with a bit of a fusion piece.I love mixed media and I often try to use up the end of a range by blending it together with some artistic, messy fun.

You should pop into the store to see the fabulous range of mixed media goodies perfect to get you started on some messy fun.


For the background I have used the Tim Holtz Distress Stain Mists, I love, love, love these for there vibrancy and how they interact with water. When you bring yours home why dont you grab a piece of white cardstock, add some water to the page then your mist and see what you can create. 

If they are too bright add some Prima Art Basic Heavy Gesso to the page first, this will make the mist more pastel.


Dont forget to keep your little strips that have the barcode, they will help ''fuse'' your mixed media background with your range of papers.


Another important thing to remember is to give your eye a rest, somewhere that is white and help give contrast to the background. A great way to do this is to use chipboard, like the Your Creative Wings Scribbles, and also with diecut shapes. 


The Tim Holtz Distress Stain mist has Picket Fence a perfect white, it allows minimal bleed through to keep it close to white over colours.


The next thing to do is add your Prima Art Basic Texture Paste through a stencil, its all about adding layers to your background.


Add some fussy flowers over and under your layers to complete the ''fusion'', also another tip, flick the Tim Holtz Distress Stains white over all your layout. This will tie the pattern papers to your background.


12x12 Scrapbook Paper Fragrance

Prima Art Basic Modelling Paste 

Tim Holtz Distress Spray Stain

Till next time have a creative day and dont forget to pop into store to grab some off these mixed media goodies.

Rikki
xxxxxxx

Wednesday, December 10, 2014

Kaiser Sandy Toes


Good Morning Rikki here today, to share with you a layout using the Kaisercraft Sandy Toes collection. I have to say I am beyond impressed with this range.  I love the vintage, beach feel and its so nice to work with this range especially if you have boys. 


When creating this layout it was one of those ones that fell together and without a lot of stress and worrying about if I had enough to make the layout perfect. I suppose thats one of the pit falls about being on a design team your always worried that your layout is to ''simple'' and not inspiring.


The Kaisercraft Sandy Toes 6x6 paper pad is perfect for layering and it offers some little hidden gems, like the die cut shapes and also little journal cards. All you have to do is cut them and your ready to layer.


I can already hear the people saying ohhhhhhhhhh noooooooooo fussy cutting !!! But with a scalpel and with a few not to perfect cuts you can add an instant layer that blends your photo to the background.


When in store check out the charms there's always a great new one to see and ones which are the perfect little touch.


One little tip is when layering don't forget to distress your edges on each layer, it helps tie them all together and its perfect for a beach layout. 

Sandy Toes Paper Pad


Sandy Toes 12x12 Die Cut - Postcard


Till next time have a creative day
Rikki 
xxxxxxxx